Aubergine in Yoghurt (Indian #3)

If this was a politics blog, I would have been busy all this time talking about all the big changes happening in the two countries I consider my home. It isn’t, and that’s why I’ve been silent. In real life, I mourned the loss of three lives, got angry at the violence of the police and worried about the future of a country that is “on the brink of the abyss”. In the meantime, the UK got a new government and I spent more than a few days complaining about not being able to vote. Not that it would have made much of difference anyway.

And after all that, I thought it was about time I put a recipe up here. If anyone still remembers, I do this thing where I pick a country and cook 10 different things from that country- provided I’ve never cooked them before. Last time I posted about this, I was doing India, and I promised some prawns. Well, guess what, I’ve gone back on my promise. But it’s ok, because this is better. Actually, it’s so good that I’ve already made it 3 or 4 times, and I thought it was about time I shared it with the world (well, actually, the BBC did that for me a while ago).

This is a very simple Indian dish, and apparently there exist other versions of it which use sour cream rather than yoghurt, but I thought I might as well keep it healthy. It’s a great side dish to any curry, or simply served with some Indian bread and/or rice.

Aubergine in Yoghurt (adapted from here)

Ingredients (serves 4 as a side)

2 large aubergines, thinly sliced into rounds
pinch of turmeric
pinch of salt
1/2 tsp red chilli powder
2 tbsp olive oil

200 ml Greek-style plain yoghurt
1 tsp sugar
1/2 tsp red chilli powder
1 tsp ground cumin

a handful of fresh coriander leaves, to garnish

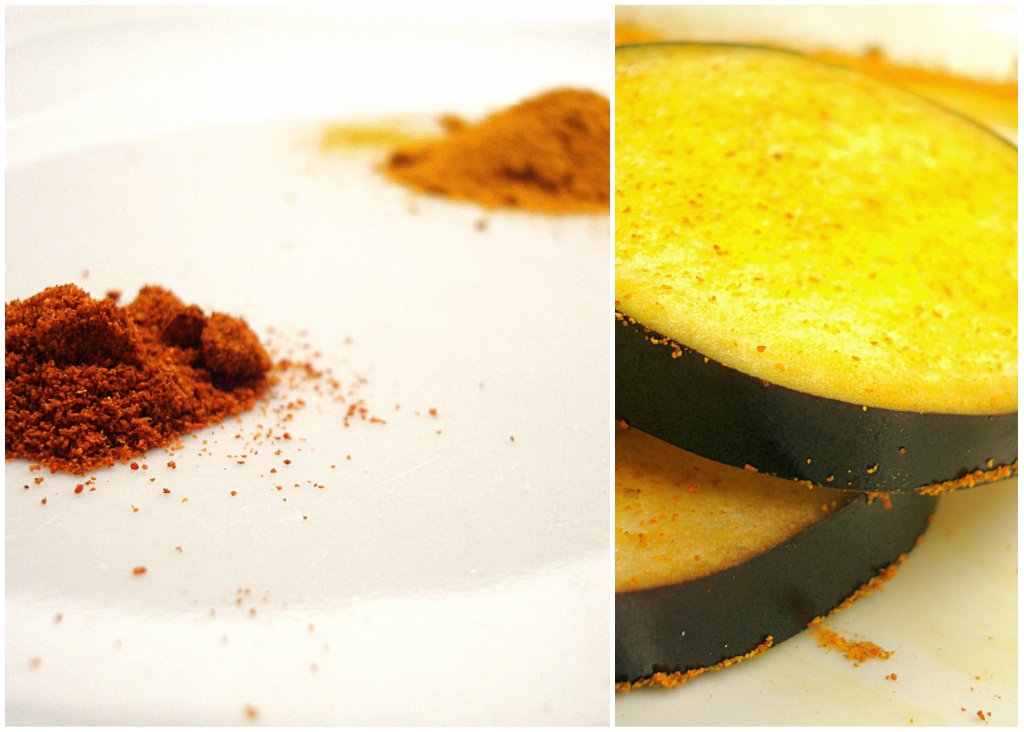
To prepare the aubergines, mix the oil with the turmeric, salt and 1/2 tsp of chilli powder in a bowl, brush each side of the aubergines and grill until soft, turning half way.

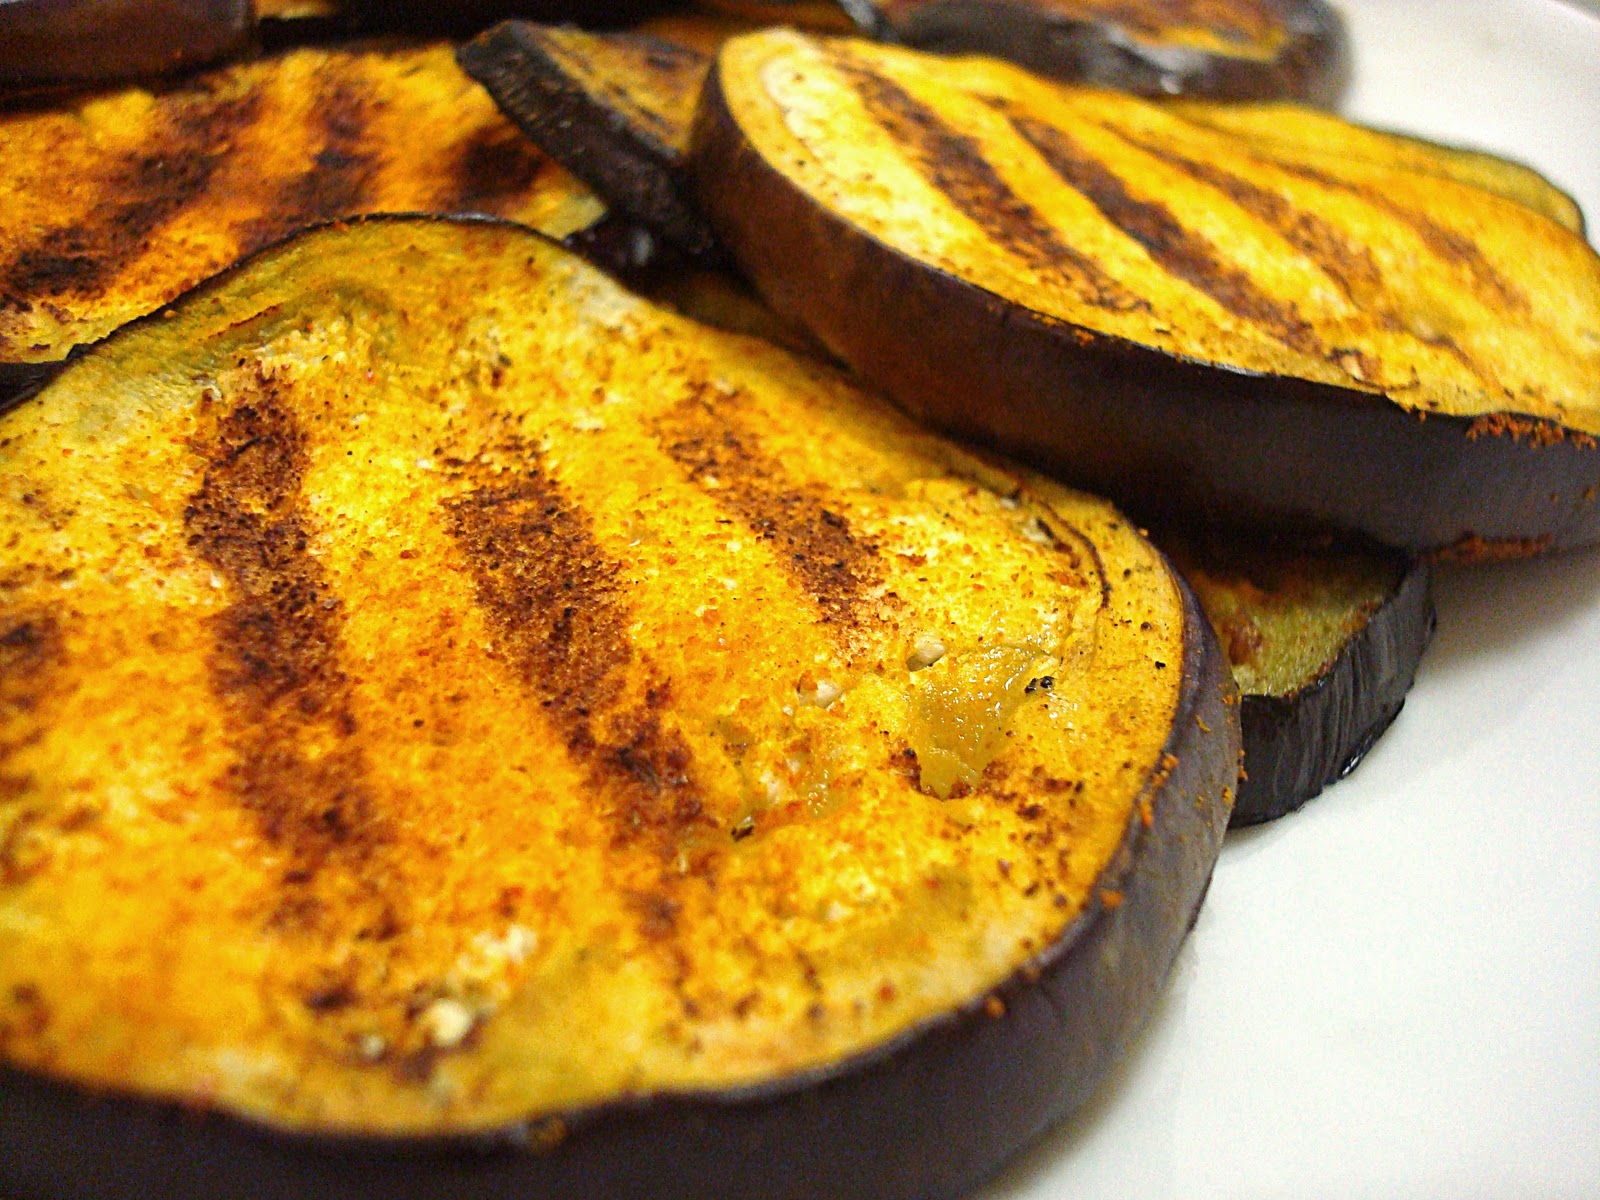
At this point, you can slice them in half to make it easier to mix with the yoghurt later.

In a bowl, beat 150ml of yoghurt with the sugar and the other 1/2 tsp of chilli powder. Roast the ground cumin in a non-stick pan over low heat until the smell starts filling the kitchen. Add the yoghurt and continue to heat gently until it’s warm. Add the aubergine slices and the remaining yoghurt and stir to combine. Serve with some chopped coriander leaves.

Have it as a side to a curry, with some naan bread and rice. It works well cold too, wrapped in pita bread for a quick leftover lunch. You can adjust the amount and type (I use hot) of chilli powder to make it as spicy as you like. I like it with a bit of a kick, as the cooling yoghurt makes sure you don’t burn yourself too much.

Previously on Round the World in 100 Recipes:
King Prawn Puri 
Saffron Yoghurt with Fennel Seed Biscuits
Next time on Round the World in 100 Recipes: No, Heston, I haven’t got an MRI scanner!

Rhubarb and Pear Frangipane Tart

I wonder how many times other food bloggers make a dish, find a few minutes to take half-decent photos of it despite the urge to forget about blogging and just tuck in and then… just never write about it. I’ve got so many sets of photos that I was actually quite happy with, of food that tasted good and I still never found the motivation to put up here.

This is what happened with this one. I’ve made a Pear and Frangipane Tart and a Caramelised Pear and Almond Cake before but now I’m quite glad they never made it onto the blog. Because this is better.

You see, not only I made my own pastry, which already makes it a winner, it also contains alcohol, which is always a plus (even is such small quantities!) and it has an extra layer of goodness between the pastry and the frangipane: sweet and sharp rhubarb compote.

Now, I can pretend it was my culinary genius that made me put rhubarb in the tart but, in reality, I had half a bowl of the stuff leftover and I couldn’t possibly bring myself to eat any more rhubarb yogurt. And a bit like this, the Rhubarb and Pear Frangipane Tart was born!

I’ve combined several recipes that I have used in the past and I think this works quite nicely. The rhubarb is sharp, the almond filling sweet and nutty and the tart crust crumbly. If I could change one thing, it would be the way I prepared my pears. Next time, instead of just popping them on the top and drizzling with sugary butter, I’ll caramelise them first on the hob to make sure they are soft by the time the tart is cooked.

Rhubarb and Pear Frangipane Tart

For the crust (from Chocolate and Zucchini):

85 gr chilled salted butter
85 gr sugar
170 gr all-purpose flour
1 tsp white wine vinegar
1 tbsp cold milk

Combine butter and sugar in a food processor until light and fluffy. Add the flour and mix until you get a crumb-like dough. Add the vinegar and the milk and pulse to incorporate.

At this point the dough should have crumb-like consistency (check!), but clump if you squeeze it together in your hand (check!). And also, smell pretty disgustingly of vinegar (check…). I believed Clotilde when she said that the smell would disappear during baking and proceeded happily.

Empty the dough crumbs in a tart dish (or a cake tin which is what I did) and spread evenly along the bottom to form a crust. Keep some extra along the edges to mold it into a low rim. Do not worry too much about making it completely even. Blind-bake it in a 170 degree oven for 15 minutes and let it cool slightly.

For the rhubarb compote:

2 stalks of rhubarb, washed and chopped
a drop of red wine
dark muscovado sugar to taste

Cook the rhubarb and the wine on the hob until the rhubarb is soft. Add sugar to taste and continue to simmer until all lumps of rhubarb have been mixed in and you have a smooth paste. Spread evenly onto the pastry.

For the frangipane filling (adapted from here and here):

75 gr butter
75 gr dark muscovado sugar
75 gr ground almonds
1 large egg
2 tbsp flour
2 tsp Amaretto (alternatively, use a drop of almond extract or omit completely)

Mix all the ingredients together in the food processor or by using an electric hand whisk until smooth. I didn’t worry too much about a few small lumps of brown sugar. Spread on top of the rhubarb compote.

For the topping:

2 pears
50 gr butter
a sprinkle of sugar

Peel the pears and slice them in quarters, removing the hard middle bit. Keeping the thin top intact, slice them to the bottom and fan them out. Arrange on top of the frangipane. Melt the butter with the sugar.

Cook in a preheated oven for 15 minutes at 170 degrees, then take it out and quickly drizzle the melted butter over the pears to stop them from drying out. Place back in the oven and cook for a further 20 minutes or until the frangipane mixture is set and the crust golden-brown.

If you prefer, you can caramelise the pears in a pan before arranging on the tart and avoid the butter-drizzling half way into the baking. Or maybe ignore this step completely. The pears should be fine, especially if they were quite juicy to start with.

When it’s done, remove the tin’s ring and let the tart cool. You can serve it while it’s still warm but I find that the flavours improve after it’s cooled down. Serve with vanilla ice-cream or clotted cream. Even though I had already had quite a lot, I couldn’t resist a slice of it plain, with a cup of tea in the afternoon.

I know the recipe looks a little bit long but it really isn’t very complicated at all and it takes very little time. If you want to make it quicker you can use ready-made sweet shortcrust pastry, although making your own is pretty easy and the taste and texture is almost certainly superior to the store-bought. You can make both fillings while the pastry is blind-baking and cooling down, do your clearing up while the whole thing is baking and then you’re ready to enjoy a lovely slice of tart, sweet, nutty, fruity goodness.

(Healthy-ish) Spinach and Feta mini-pies

What do you do when you’ve spent three days eating huge amounts of spit-roast lamb for lunch and dinner?

Apparently, you find yourself ordering a crepe at that (life-saving) 24h sandwich shop. At 4 in the morning. I can’t even remember what was in there, but there was definitely cheese, chips (yeah, obviously) and mayo. And probably some meat.

Greedy.

I woke up with no hangover – thankfully all those calories didn’t completely go to waste. But I was really hoping to eat something slightly healthier and preferably green-coloured. I don’t think my mum has ever seen me so excited about spinach.

The recipe is of course quite vague, since this is how mum described it to me. Actually, her first sentence was “Make some dough” and she was not going to offer any further explanation. Thankfully she saw the blank look on my face and got the hint.

Spinach and Feta mini-pies

For the dough

500 gr all-purpose flour
2 tbsp olive oil
1 tsp salt
enough water to make a dough (~1/2 pint)

Simply mix the flour with the oil and the salt and then add water gradually and knead until you have a dough. You want it as wet as possible without sticking to your fingers or the bowl. Knead until smooth and let it rest. In the meantime, prepare the filling.

For the filling

200 gr spinach
6-7 spring onions
a bunch of dill
150 gr feta, crumbled
2 tbsp rice, washed
olive oil
a pinch of salt and some pepper

First of all, wash your greens and chop them up. In a big bowl, mix with the cheese and the rice. Add some pepper, a little bit of salt, depending on how salty your feta is, and drizzle with olive oil. Mix to combine.

By now the dough should be ready to be used. Cut off an apple-sized piece and place it on a lightly floured surface. You want to roll it out to a rectangular shape, a bit like in the picture below, but probably a bit thinner than mine. Make it thin enough so that you can just about see there’s spinach inside when you fill it and roll it up.

Add some of the mixture in the middle and then roll it into a long cylinder. Squeeze the ends of the dough to seal them and roll it in this kind of shape:

Brush top and bottom with some olive oil, place on a tray and cook in a preheated oven (180 degrees) for about 30-40 minutes or until golden brown. My mum turned them round towards the end, but I forgot to. Not sure how much of a difference it makes but you should probably do it anyway.

I think mine also needed a bit more cooking, but I was in a hurry. I reheated a couple the next day, and they were nicer, so leave yours until they look a bit darker than the ones on the picture.

I really love making a big batch of these and having them for lunch the next day too. You can also have them as a light dinner or serve them as a side to something meaty (in Greece we had them with some lamb – of course!).

You can add less authentic things in there too, like some kind of meat, diced finely. Just don’t skip the rice, it makes a big difference as it absorbs the liquid from the spinach and stops them from turning soggy.

Homemade pasta

Ah, it’s been a while, hasn’t it? I’ve just come back from a skiing holiday in Austria and I am still trying to recover from a silly amount of muscle pain and a salty food and beer overdose. All in all, a successful holiday. Photos (mainly of food and snow) will follow.

I took my netbook with me hoping to write a couple of posts and keep up with a bit of work, but in my search for wifi all I found was giggles from the locals. I managed to locate a computer with The Internet on it, in a hotel basement, but I couldn’t bring myself to stay down there for long when the sun was shining and the pistes were waiting!

Anyway, enough with the Austria talk, since it (probably) belongs to a different post. I though I’d tell you about a little adventure I had before I left. It was after a long day of work so I came back completely exhausted and brain-dead. Alex wasn’t around which can only mean one thing: pasta for dinner! It was going to be an easy, straightforward meal, until I read this post.

I had tried once before to make my own pasta and decided to dive into the most difficult recipe I could find: Soft egg ravioli. Well, the egg wasn’t too tricky, but the pasta was so difficult to roll out that I spent literally hours trying to make half a dozen of them. I decided I would not try it again without a pasta machine. But Dawn claimed that it was pretty straightforward even by hand, and I decided to give it a go.

Well, she was right! It was actually so good and so easy that I made it again the next day. Here is the recipe, although I haven’t done anything different than she did.

Pasta Dough (from Kitchen Travels)

Ingredients (1 egg per slightly greedy person)

3 cups all-purpose flour, plus extra for kneading and rolling
4 eggs
1 tablespoon olive oil
1/2 teaspoon salt

Sift the flour into a large bowl or a clean surface. In another bowl, beat the eggs, olive oil and salt until smooth. Mix with the flour until it has all been incorporated. Knead until smooth. 

It didn’t take me more than 10 minutes of kneading until the dough looked smooth and elastic. Wrap in cling film and let rest for half an hour. I took advantage of that time to make the sauce.

Cut in 4 equal pieces and roll each one out onto a thin sheet. The pasta will get thicker when cooked so make sure you make it thin enough. Dust your surface and rolling pin with flour so the dough doesn’t stick.

It only takes 5 minutes to roll out and the dough is very nicely behaved.

I cut it into strips using a pizza cutter but you can use a knife or cut them into circles/squares and fill them with whatever you fancy.

Cook in salted water for about 4 minutes, although it depends on how thick they are. Serve with your favourite sauce.

The taste and texture is so much better than dried pasta (although I’m still a huge fan of course!) or even store-bought fresh egg pasta. You can easily make a very simple tomato sauce while the dough is resting and you have yourself a really tasty and surprisingly quick meal! I had mine with a roast tomato and aubergine sauce and loads of grated cheese on the top. For two days in a row.

I suppose the point of this post is to urge all of you pasta lovers to go ahead and make your own pasta if you haven’t done it before. Do not be intimidated if you haven’t got fancy equipment. Kneading and rolling is pretty therapeutic and the result will be worth it!

Orange and Chocolate Cake

My love for Nigella is no secret- her recipes always produce great tasting food with not much fuss. But it’s more than that. Her shows are almost addictive, and her over-the-top, almost sexual attitude towards food makes them more fun. I doubt she actually does get up at 3 in the morning, makes some french toast and strawberry coulis and then, leaving the kitchen in a mess, goes back to sleep. I don’t believe it, but I like it. It would be fun if you could do it, not get fat and not wake up to find a filthy kitchen.

I’ve only got one of her books, Feast, although I’m coming to believe that Nigella Express is one of the must-have cookery books. I love reading Feast. I haven’t cooked much from it yet, but I’ve probably read it cover to cover. The way she talks about food would make anyone fall in love with it.

Last year I discovered her Guinness Chocolate Cake and loved it. So dark, with a great texture and the Guinness influence, although not strong, adds an earthy flavour to it. It’s become a favourite and everyone who has tried it has loved it.

A year later, I found myself looking for a recipe for another chocolate cake, for the same friend’s birthday. In Feast, I found the recipe for an Orange and Chocolate cake, a combination that I really like. It looks so simple, it’s almost worrying.

You see, what you have to do is boil some oranges, then pop them in the food processor, and then add all other ingredients in there too. Oh, and bake it. Gregg would stuff it in his mouth and then proclaim that “cooking doesn’t get easier than this”.

Orange and Chocolate Cake (from Nigella)

Ingredients

2 oranges, weighing approximately 350 gr
6 eggs
1 heaped tsp baking powder
50g cocoa
200g ground almonds
250g caster sugar
Half tsp bicarbonate of soda

optional: orange peel to decorate

Boil the oranges (whole) for about 2 hours or until soft. Cut them in pieces, get rid of any seeds or hard bits and pop them in the food processor. Meanwhile, line and butter a round cake tin (23 cm) and preheat the oven to 170 degrees.

Pulp them until smooth. Let cool for a bit (I left it in the fridge for a few minutes) and add all other ingredients. Mix until you have a smooth batter.

Place in the tin and bake in the oven for 50 minutes to an hour. When it’s ready, place it on a cooling rack and let it cool completely.

Have you noticed that it has no butter and no flour? Perfect for the gluten intolerant and, although I’m not going to pretend this is healthy, it’s certainly not as bad for you as other chocolate cakes. The oranges make it so moist you won’t able to tell there’s no butter in there and the taste is quite strong, unlike other orange cakes that only use juice or zest. You can make a ganache for it if you like but I don’t think it needs it. Some ice cream would be nice with it, although we had it plain and it was gorgeous.

Apple Tarte Tatin

I absolutely love apple desserts: apple crumbles, apple pies, apple tarts. Saying that, it is weird that I only discovered tarte tatin when, a couple of years ago, I got a French (almost) housemate. She loves cooking too, and one evening she produced the best apple tart I had ever tasted. How had I not thought of this before? Caramelised apple tart. The perfect dessert? Possibly.

I didn’t try it to make myself though. It always seemed a bit of a faff to be honest, and everyone who made a tarte tatin on Masterchef (and Masterchef is never wrong) used some kind of fancy equipment or made it look and sound too complicated.

The other day, I had a lot of apples left and it had been a hard week, so we thought we’d cook ourselves a treat. We made some steaks and some dauphinoise potatoes and I made a tarte tatin for pudding. Well, almost. I completely underestimated how long it would take to cook, so we had brownies for pudding and I decided to finish the tarte tatin the next morning.

And this is the only thing that stops this from being the perfect recipe: it takes a while. But it’s completely worth it. Perfectly sweet and soft apples in the middle, sticky at the edges, with crumbly, buttery puff pastry at the bottom for some texture contrast.

Apple Tarte Tatin

Ingredients

6 crisp medium apples
100 gr butter, softened
100 gr caster sugar
250 gr puff pastry

Peel and core the apples and cut them in quarters. Spread the butter as evenly as possible on the bottom of a round oven-proof bowl, with a flat bottom, about 20cm in diameter. Sprinkle the sugar on the top.

Place the apples, cut side up, symmetrically around the bowl. The bottom side is going to be on the top later on, so make it as pretty as you can. When/if you run out of space, slice the rest of the quarters in 2-3 pieces and place them on top of the apples already in the the bowl. It doesn’t matter if these will look pretty as they will end up at the bottom of the tart anyway. 

Cover with foil and cook in the oven at 170 degrees for 1 1/2 hours. Take the foil off and cook for another half hour, making sure the top doesn’t burn.

Roll your pastry in a circle big enough to cover the apples. Place it on top of them (I did that when mine had cooled down, not sure if it makes a huge difference but you’ve been warned) and tuck the ends inside, between the apples and the bowl. With a knife, pierce the pastry in a couple of places to make sure any steam can come out. Cook for half an hour or until the pastry is cooked.

The bottom should now be looking beautifully caramelised. Place a plate on top of the bowl (make sure you don’t burn yourself!) and quickly turn it upside down so that the pastry lands on the plate. The apples should follow.

I was a bit scared of this part but it actually worked fine, almost nothing got stuck on the bowl. Any buttery juice will end up on the pastry, making the edges really sticky. It is genius.

Serve with vanilla ice cream or some creme fraiche. I love it either warm or cold. And now that I know how to make it, it’s my new favourite dessert. It does take time, but you don’t have to do anything as your oven will do all the work. Perfect for a weekend treat or a dinner party as it is definitely a crowd pleaser.

Saffron Yoghurt with Fennel Seed Biscuits (Indian #2)

In my search for different Indian dishes to try, the BBC website has been a big help. Have you ever watched the Indian Food Made Easy show? Although names like that normally put me off (possibly because it sounds like you’re cheating!) I have enjoyed the few shows I have watched and the food always looked really yummy. All the recipes are available online, and quite a few of them are accompanied by a video clip of the particular dish in the show, so it’s very useful and makes it easy to follow.

I saw this recipe for Fennel Seed Biscuits and I thought I’d give them a go. For some reason, I had imagined them to be shortbread-style, but after reading the recipe I realised they were nothing like it. For starters, they needed frying rather than baking. As mentioned in the recipe, they go nicely with creamy desserts, so I decided to make this Saffron Yogurt to go with them. I love using saffron, just because it looks awesome, and it seems like an extravagant thing to do. Pity I don’t have a clue where to use it! This recipe was starting to sound perfect for me.

Sweet Saffron Yoghurt (Shrikand) (recipe adapted from here)

Ingredients

500 ml greek-style yoghurt
2 tsp milk
1/2 tsp saffron
icing sugar (to taste)
1/4 tsp ground cardamom seeds

Heat the milk in a cup in the microwave and crumble the saffron strands in it. Let the saffron infuse for 5-10 minutes. Every now and then, use the back of a teaspoon to crush the saffron into the milk.
Mix the icing sugar with yoghurt until it’s sweet enough for you. I don’t like it too sweet actually, especially with the biscuits, so I think I must have used 3 tbsp. 
Add the saffron milk (I discarded the saffron but, thinking about it, I probably should have kept it) and the ground cardamom seeds. Leave it in the fridge until ready to serve.

Note that the recipe calls for you to drain excess water from the yoghurt by draining it for a few hours in the fridge, using a tea towel and a sieve. I skipped that step as I used a tub of Total Greek yoghurt, which is already quite thick. If you use thinner yoghurt, you probably want to follow that step and also use more than 500 ml as it will lose water and reduce in volume.

Fennel Seed Biscuits (adapted from here)

Ingredients

80g plain flour, sifted
70g caster sugar
140ml milk
1½ tsp fennel seeds, ground to a powder in a pestle and mortar
pinch of salt
1 tbsp ground almonds
2 tbsp butter, melted
4 tbsp ghee or vegetable oil, for frying

Mix all the ingredients (apart from the oil/ghee) in a bowl and let them rest for 10 minutes. Heat the oil or ghee in a small frying pan and drop tablespoons of the mix in it. Fry for a couple of minutes, turning once. You want to have the oil hot enough so that they don’t absorb too much oil, but not too hot because the edges will brown too much. When cooked, place them on some kitchen towel to get rid of excess oil.  

I’m not sure whether these two are served together traditionally but I think the biscuits went very well with the sweet and fragrant yogurt. I’m sure you could have them separately or use them in different combinations. We actually had some of the yogurt by itself the next day, but it would also be very good with a sprinking of nuts.

Previously on Round the World in 100 Recipes:
King Prawn Puri 

Next time on Round the World in 100 Recipes: Trying to use up all those prawns. They turn out great.

Rice Pudding (Greek #10)

Ah, hello beautiful feeling of achievement! Sometimes I forget how good you feel. Both in my work and in this blogging business (alright, hobby) I got myself into, days can go past when nothing feels right. Food that isn’t worth writing about and maths that doesn’t mean anything no matter how hard you squint, or scale, or both. Today isn’t one of those days, I think. The sun helps too.

But is a bowl of rice pudding worth blogging about? And how challenging can it be to qualify as part of a challenge?

Well, I haven’t cheated. I’ve never made rice pudding before, not the Greek kind, not any kind. And this is about me learning, right? And it was totally worth it because when I tasted it, it made me feel like a kid again. It was exactly right. Now, you might like your rice pudding a specific way, and I don’t blame you. This one is the one I grew up on. It’s a bit different to English rice pudding; first of all, it’s supposed to be eaten cold. It tastes better cold. And secondly, you sprinkle cinnamon on top. No nutmeg, no jam. It’s got to be cinnamon.

The recipe comes from the Greek Delia as I like to think of her, or Vefa as is her real name. I’ve changed quantities a bit as I didn’t like it as sweet and I thought the amount of cornflour was a bit on the extreme side.

Greek Rice Pudding (adapted from here)

Ingredients (makes 6 portions)

1/2 cup rice, washed
1 1/2 cups water
1/4 tsp salt
4 cups milk
1 tsp cornflour
1/3 cup sugar (or up to 1/2 cup, depending on how sweet you like it)
vanilla extract
ground cinnamon

In a pot, bring the water to boil and add the rice. Cover and let it simmer until all the water has been absorbed. In 1/4 cup of the milk, add the vanilla extract and the cornflour and dilute. Bring the rest of the milk to boil (or warm up in the microwave which is what I did) and add it to the rice, together with the sugar. Let it simmer for about 20 mins. When it’s done, thicken it by adding the cornflour-milk-vanilla mixture, bring to boil and cook for another 5-10 mins while stirring to make sure it doesn’t stick to the pan. Let it cool and split it into 6 bowls. You can keep them in the fridge until you serve them.

You know the thing I said before about cinnamon? Don’t listen to me and my food pedantry. Rice pudding is the easiest and friendliest and least pretentious pudding in the world. Have it with whatever you fancy!

Doing these 10 Greek recipes has actually been harder than I initially thought- I cook Greek stuff all the time and it was quite tricky (but also very exciting!) to try and come up with things I hadn’t made before. You can argue that a couple of the things I made were just borderline acceptable, but it was fun and I learnt stuff! Next country is going to be India because a bit of spice is going to help us get through the end of the winter. I’m really looking forward to it; in the meantime, if you would like to have a look at the other Greek dishes I made, here’s a list:

Spetsofai
Stuffed Onions
Lihnarakia
Beef with Aubergines
Ladopita 
Cheese and Salami Pie
Pork Souvlaki
Homemade Pita
Rabbit Stifado

Chocolate bread and butter pudding

Sometimes I get a craving for chocolate. I keep some in the cupboard for emergencies. But it has to be of the non-dangerous kind, i.e. no praline, no mini eggs and no chocolate hobnobs.

And more often, I crave carbs. Apparently that’s a sign of winter depression, lack of sunlight, etc. I’ll blame it on that. My main addiction is pasta, but I wouldn’t exactly turn down some crusty bread or a toasted crumpet with loads of melting butter on top.

You see, I am not really very good at resisting temptation. I can pretend I’m not going to finish that box of cookies, but then I’ll spend half hour thinking about them. And then I’ll be angry that I’ve wasted so much time thinking about cookies. And so I’ll eat them. Once, I had to throw a bag of hobnobs in the bin because I couldn’t stop eating them although I was feeling sick. It’s a good thing I live in a shared house and people help me finish off everything I bake, or I would be twice my size.

The reason I’m saying all this and making myself sound so greedy is to explain how I got round to making this intensely rich pudding.

I read this post on Life’s a Feast.

It’s Jamie’s fault.

Chocolate Bread and Butter Pudding (from Delia)

Ingredients:

9 slices of stale white bread, no crusts
150 gr good dark chocolate
75 gr butter
425 ml whipping cream
4 tbsp dark rum
110 gr caster sugar
3 large eggs
pinch of cinnamon

Cut the bread slices in 4 triangles. Place the chocolate, whipping cream, rum, sugar, butter and cinnamon in a bain-marie until everything is melted, and give it a good stir. In a separate bowl whisk the eggs, then pour the chocolate mixture over them and whisk very well.

Spoon about 1/2 inch layer of the chocolate mixture into the base of a shallow dish, about 7 x 9 inches, which you have buttered lightly. Then, arrange half of the bread triangles, add half of the remaining chocolate, then the rest of the bread and finally the last bit of chocolate. Make sure the bread is well soaked by pressing down into the chocolatey liquid.

Ideally, you need to leave this outside the fridge covered with clingfilm for a couple of hours, and then in the fridge for a day or two to let the flavours develop.

Cook it (without the clingfilm!) on the top shelf of a preheated oven (180 degrees) for 30-35 minutes or until the top looks nicely crispy. Be patient and wait for 10 minutes when you get it out of the oven as it will be very hot. Serve with cream or custard or ice cream. Or all of them.

We didn’t manage to finish it on the first day as it was so heavy, but it was possibly even better for the next couple of days and the texture developed into some kind of rich fudge cake with a layer of crunchy chocolatey bread on the top.

The concept of Monthly Mingle was new to me, but I couldn’t resist Jamie’s invitation to make something combining two so special ingredients and when I looked at the recipe I realised it would be a winner: really, you can’t go wrong with chocolate, cream, bread and eggs. If you like bread and butter pudding, try this version – I’m sure you’ll love it. And let me know how it went!

Cheese and salami pie (Greek #6)

I’m talking about a Greek style pie of course, which involves layers of phyllo pastry on the top and bottom with a filling of your choice. Most common example I suppose is the spinach pie or Spanakopita. The one I made is loosely based on Pastourmadopita and it was made in an effort to use up all the graviera cheese that was sitting in the fridge for a couple of weeks. It turns out it’s quite tricky to eat 1.5 kilos of cheese before it starts turning mouldy.

The recipe originally uses kaseri, a cheese with similar texture to cheddar. The one I had, graviera, is a hard salty and spicy cheese, which doesn’t melt as well. In this case it didn’t matter, as I made some bechamel sauce for the filling, but if you are not doing that you probably want to use a meltier cheese. If you can’t find graviera you can instead use some Pecorino. I also substituted pastourma, a type of cured beef, for some peppery salami I had brought back from home.
Cheese and Salami Pie
Ingredients:
1 pack phyllo pastry (~8 sheets)
olive oil for brushing
sesame seeds for sprinkling


For the filling:

400gr cheese, grated
1/2 salami, chopped

2 medium-sized tomatoes, no seeds or excess juice, chopped
1-2 red pointy peppers (or any other kind you prefer)
bechamel sauce* (use just enough to bind everything together without making it too saucy, see below)
ground pepper

Grill the pepper(s) until lightly charred and then chop them, discarding seeds.


Mix all the filling ingredients together and add the bechamel sauce. You probably don’t need any salt, as the cheese will be quite salty, but you can give the filling a taste and adjust it accordingly. Place half of the phyllo sheets on the tray, brushing with olive oil between each layer. Top with the fillling.


Fold the edges of the phyllo on top, cover with the rest of the sheets (brushing with olive oil again!) and tuck the ends inside the tray. Use a knife to cut through the top layer down to the filling, making sure you don’t cut all the way to the bottom phyllo layer. Sprinkle with sesame seeds.


Cook in a preheated oven at 180 degrees for about half an hour or until golden on the top.

Serve it with some salad on the side.

You can see that I didn’t do a great job when I tucked my phyllo sheets in as some of the filling escaped but it didn’t really matter. The flavour and smell are brilliant. The salami is spicy and strong-flavoured and makes for a great addition to a standard cheese pie. The pie is quite heavy because of all the cheese and the sauce, but the peppers and tomatoes make it more aromatic and somehow it tastes lighter because of them.

*About the bechamel sauce:
You can use your favourite bechamel sauce recipe; I make it the way my mum always does and these ingredients will make you just a bit more than what you need for the pie. Then you can eat the leftovers from the pot while your pie is baking.

3 tbsp flour
3 tbsp olive oil
milk
nutmeg
salt, pepper

Quickly fry the flour with the olive oil until it becomes a smooth paste. Turning the heat right down, add the (preferably warm) milk slowly and stir/whisk. I never know how much milk to use, I just keep adding it until the sauce reaches the right consistency. You want quite a thick bechamel for this recipe. Let it come to the boil, but keep whisking to avoid the bottom burning and the sauce turning lumpy. Add the seasoning according to taste (but remember that for this recipe, you are about to add salty cheese to the sauce).

Previously on Round the World in 100 Recipes:
Spetsofai
Stuffed Onions
Lihnarakia
Beef with Aubergines
Ladopita

Next time on Round the World in 100 Recipes: Meat Feast!