Ladopita (Greek #5)

Do you like Marmite? I don’t, although I’m trying to get used to it slowly, somehow it feels like it is something I should enjoy. My point is, this cake is like Marmite, as in you either love it or you hate it. So far, a handful of my friends say they enjoy it, while the rest could happily survive without trying it ever again in their lives. But don’t let this put you off; you should give everything a go. Especially something so traditional and local and simple yet special as this.

As far as I’m aware, this cake is made only on a small island in Greece, on which I grew up. It is made by grannies on villages in large batches and then given away as presents to family and friends. At least that’s what happens in my family. It really is a matter of pride, to be able to make one of those well! People grew up on this stuff, because it involves such cheap and common ingredients and lasts well for a few weeks. Everyone knows what one should taste like, and they are very critical of any alterations of the recipe (even substituting honey for sugar is frowned upon!).

My mum attempted making it once. I was about 10 years old. I remember a lot of running around in the kitchen, some panicking and a lot of vigorous mixing. The end result was nice I think, but it didn’t compare to my granny’s version and I think my mum decided she would never manage to make one as good as the original one. Having been so critical of other people’s efforts, she decided to not put herself in that position again.

So what chance did I stand?! Although it could well be a failure, I was safe in the knowledge that my parents would not have to taste it and any criticism would come only from people that didn’t really know what a good one tastes like. And myself.

But I’ve just realised I haven’t even told you what I’m making yet! This Greek “cake” is called Ladopita. And that translates to “Oil Pie”. Olive oil of course. I wonder how many people have just closed this tab. Oh well. There you go:

Ladopita

Ingredients (This is a quarter of the standard recipe and makes about 20 pieces. It’s enough, trust me.)


2 glasses of water
1 3/4 glasses of olive oil
1 glass caster sugar
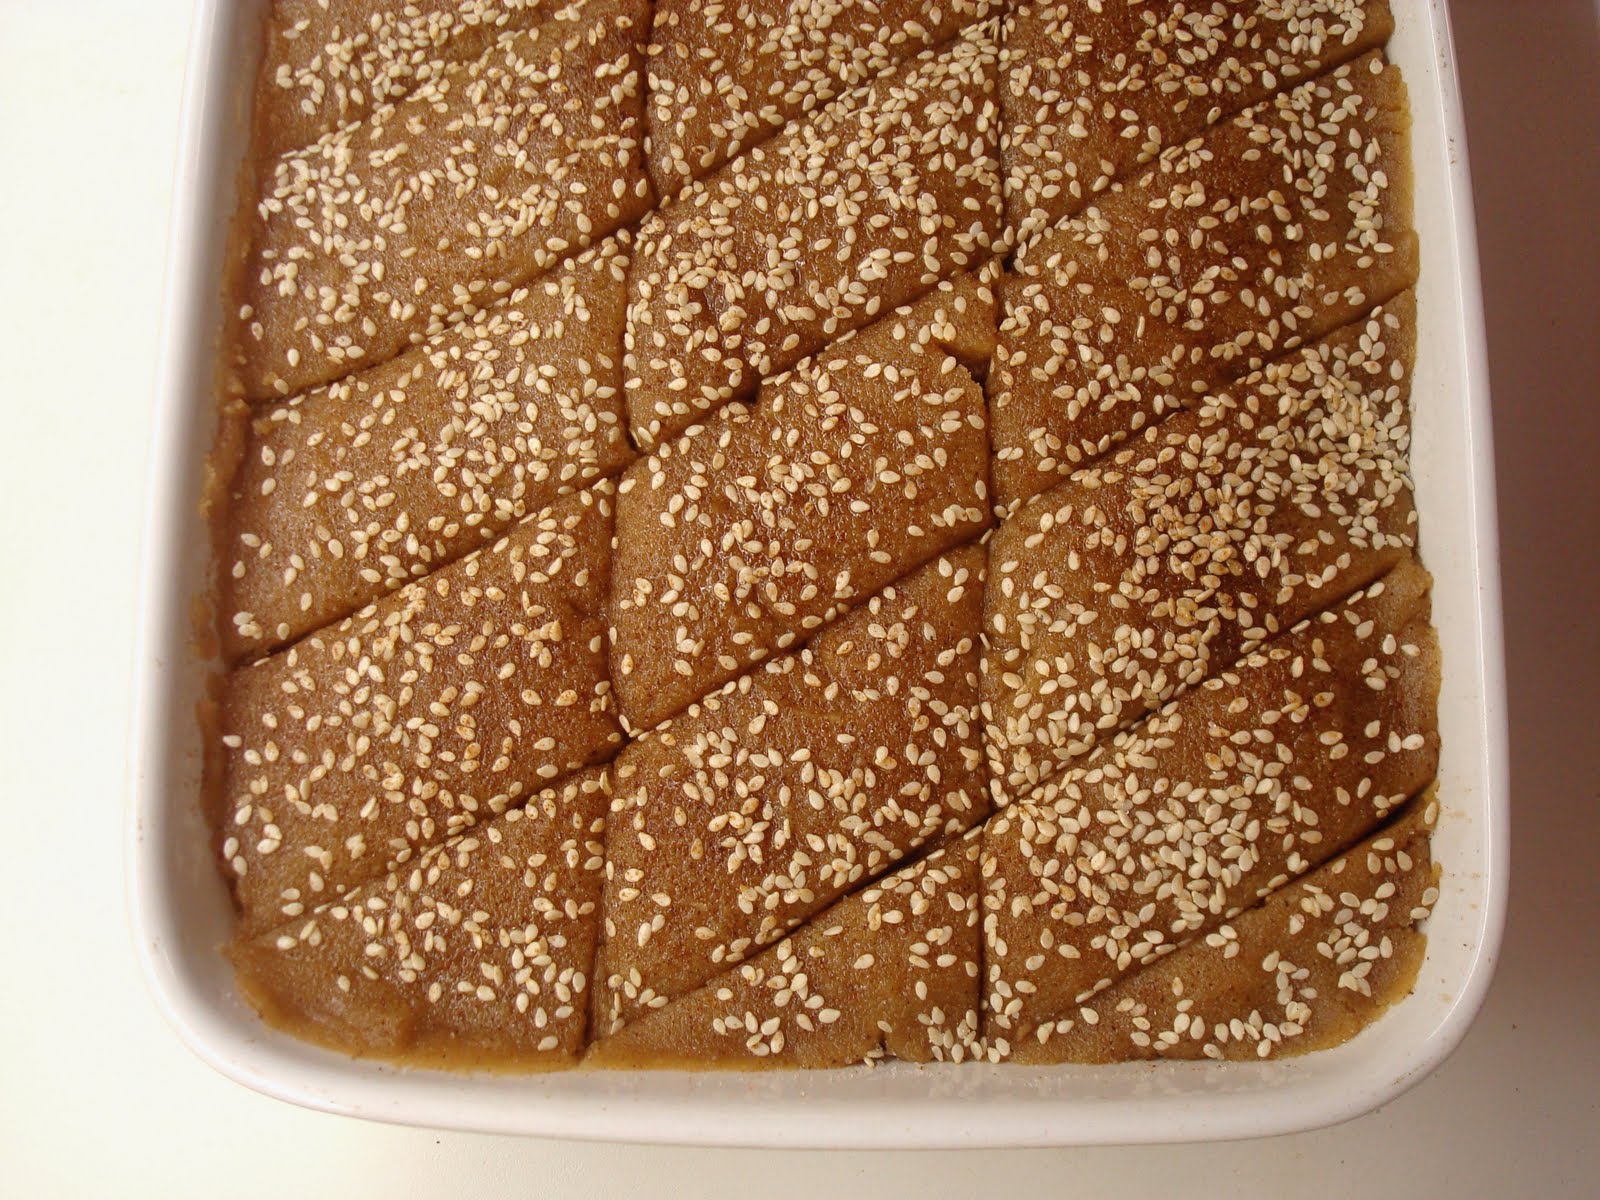
around 500 gr all-purpose flour
sesame seeds
ground cinnamon

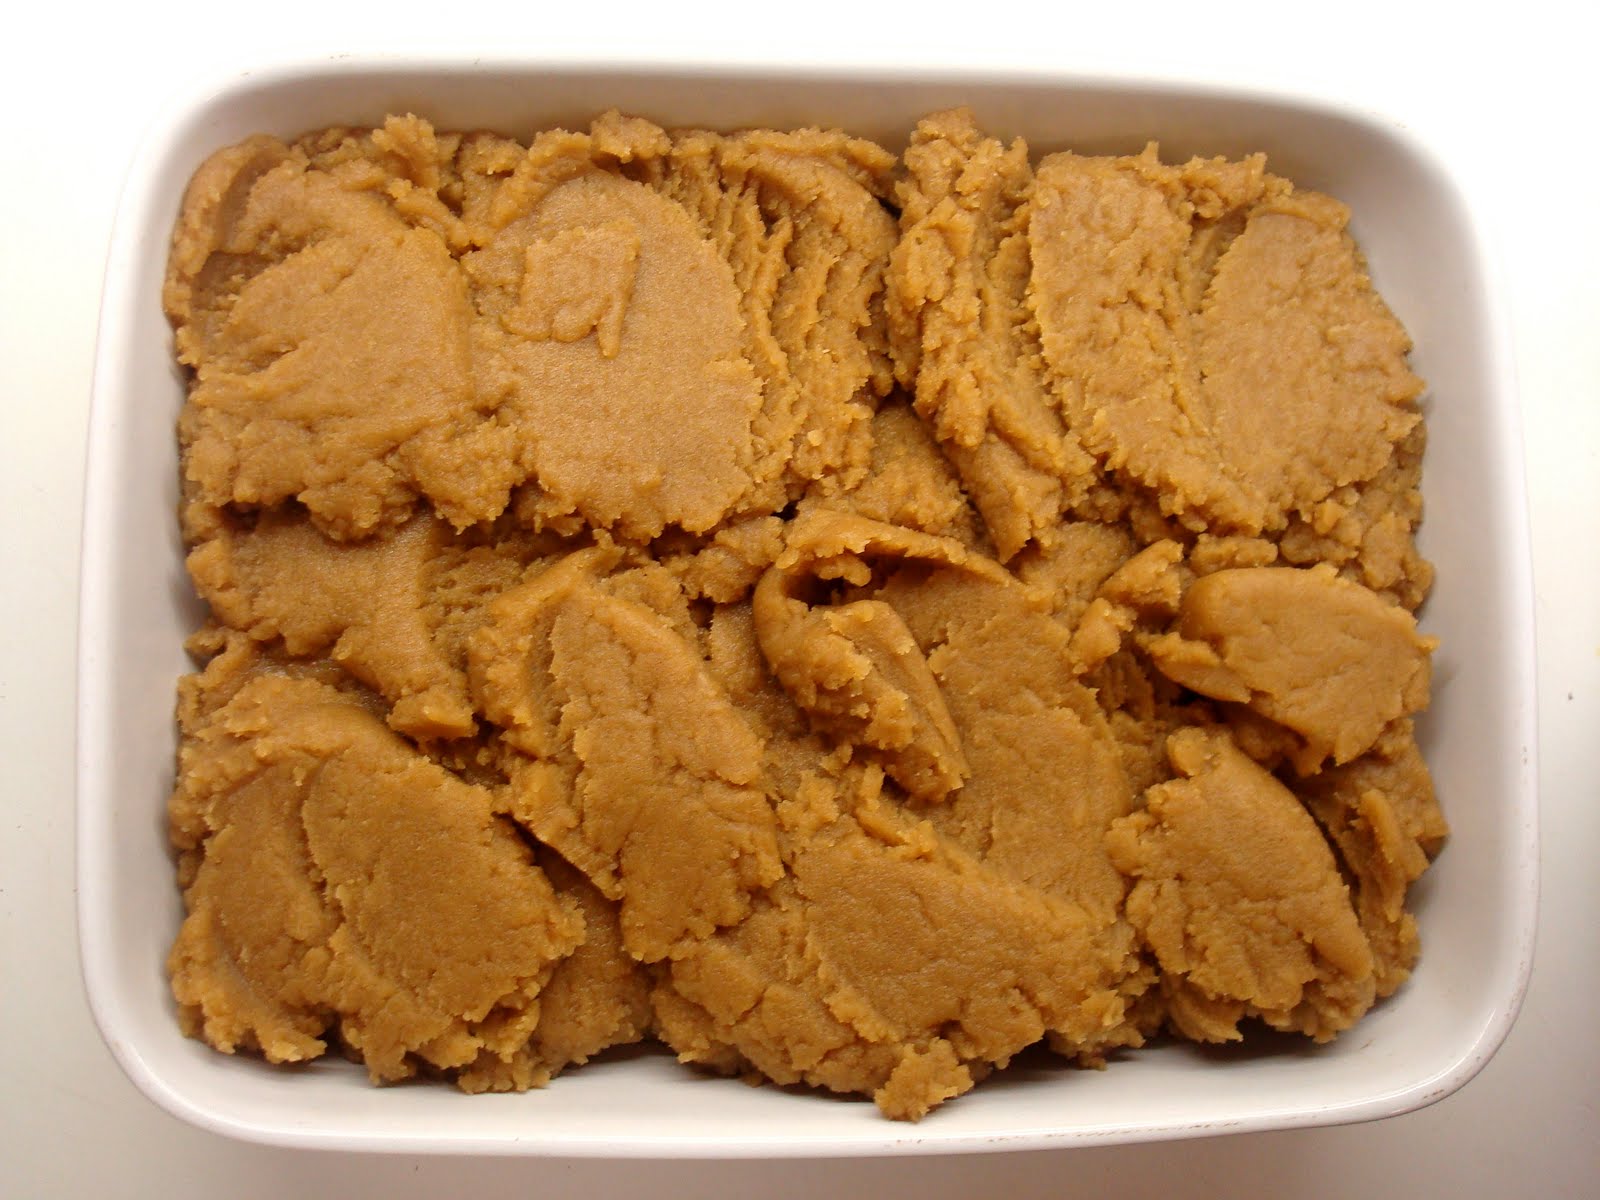
I know that using glasses isn’t really the best way to measure things, and I have already expressed my disliking of the cups method, but this is a traditional Greek recipe. I wouldn’t dare spoiling it by making you use scales! It’s easy to estimate what half a kilo of flour is from a 1.5 kilo packet. Just use a standard water glass, about 250 ml. You can decide how much flour you need by judging the consistency of the mixture.

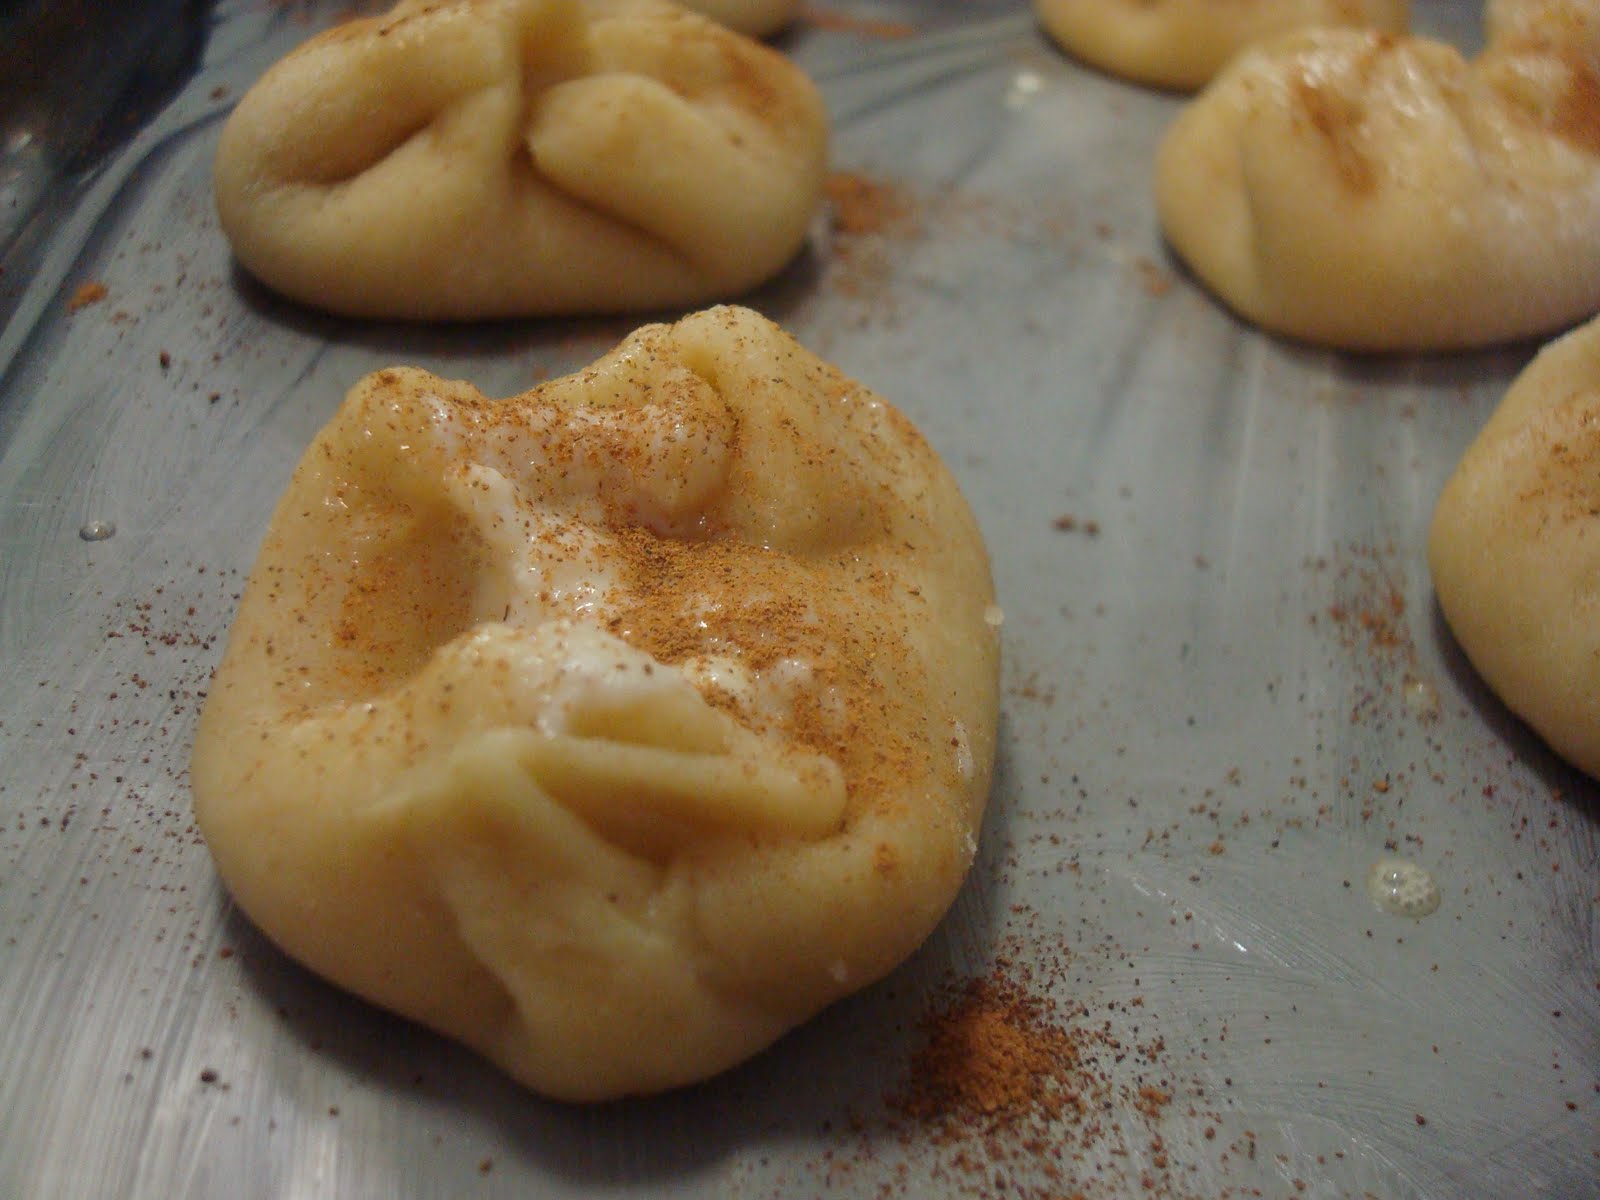
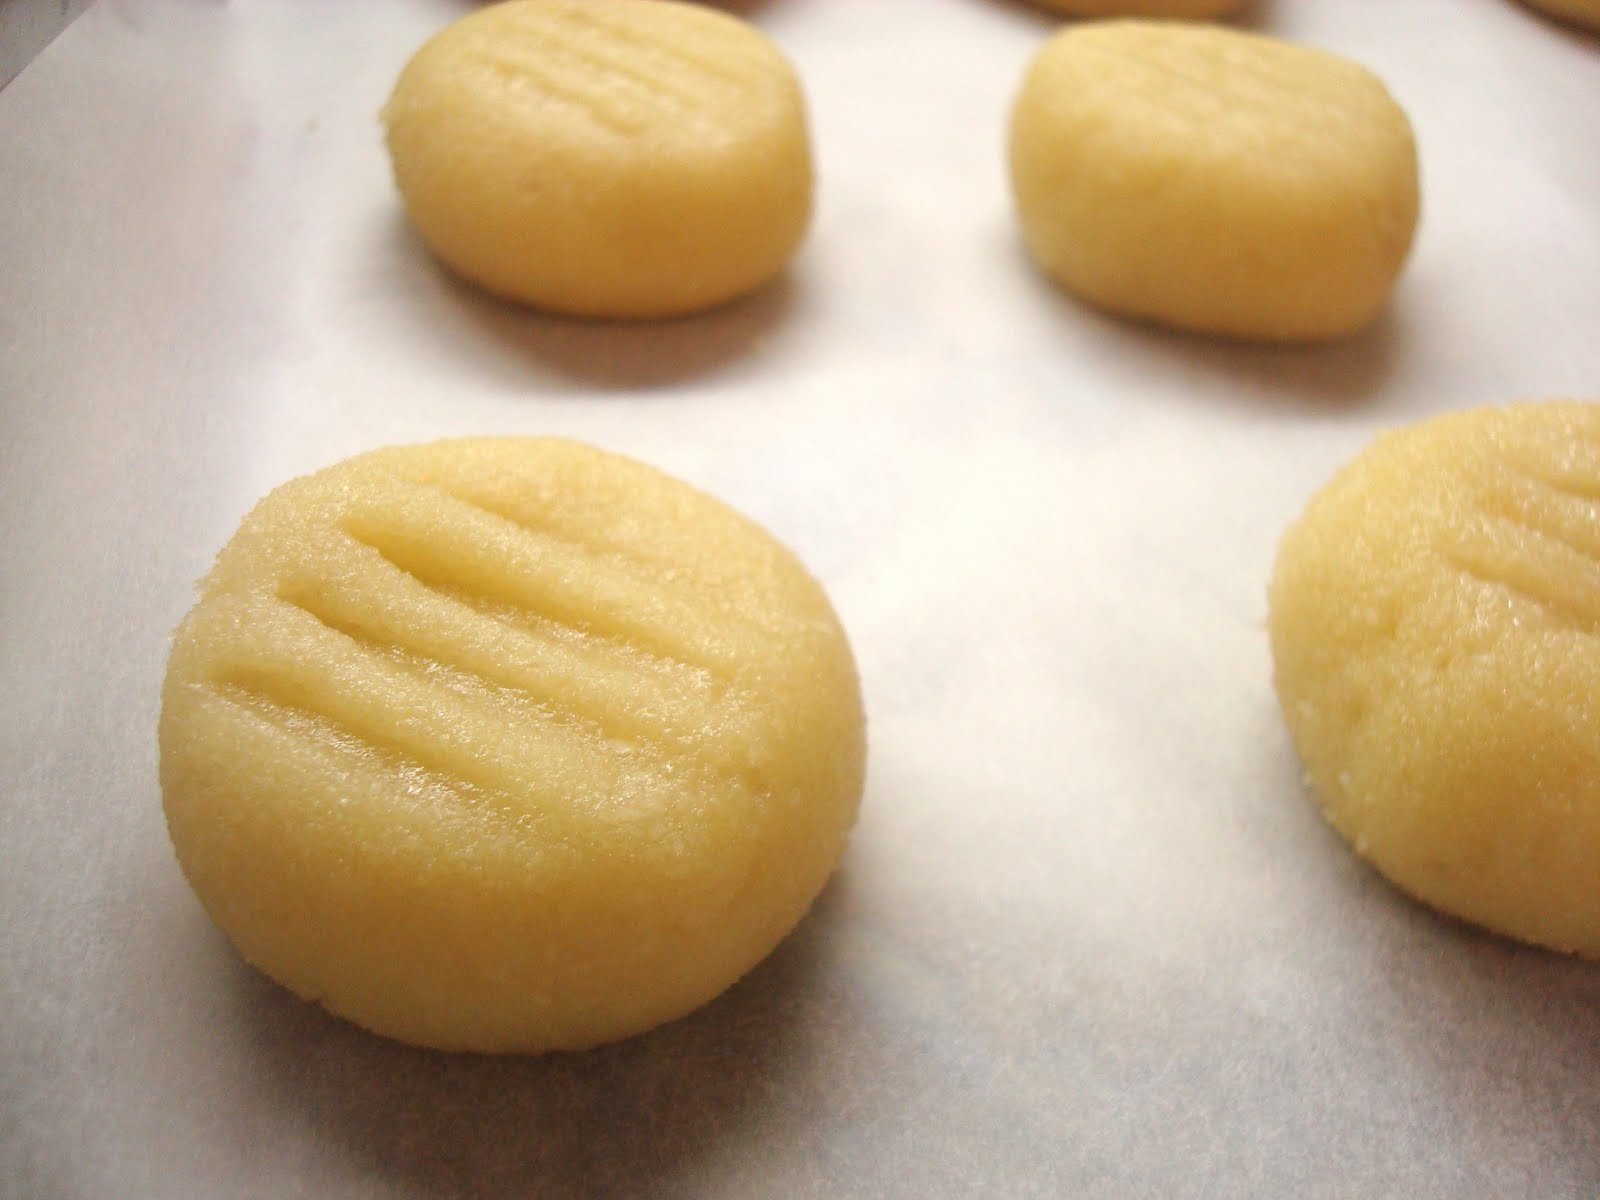
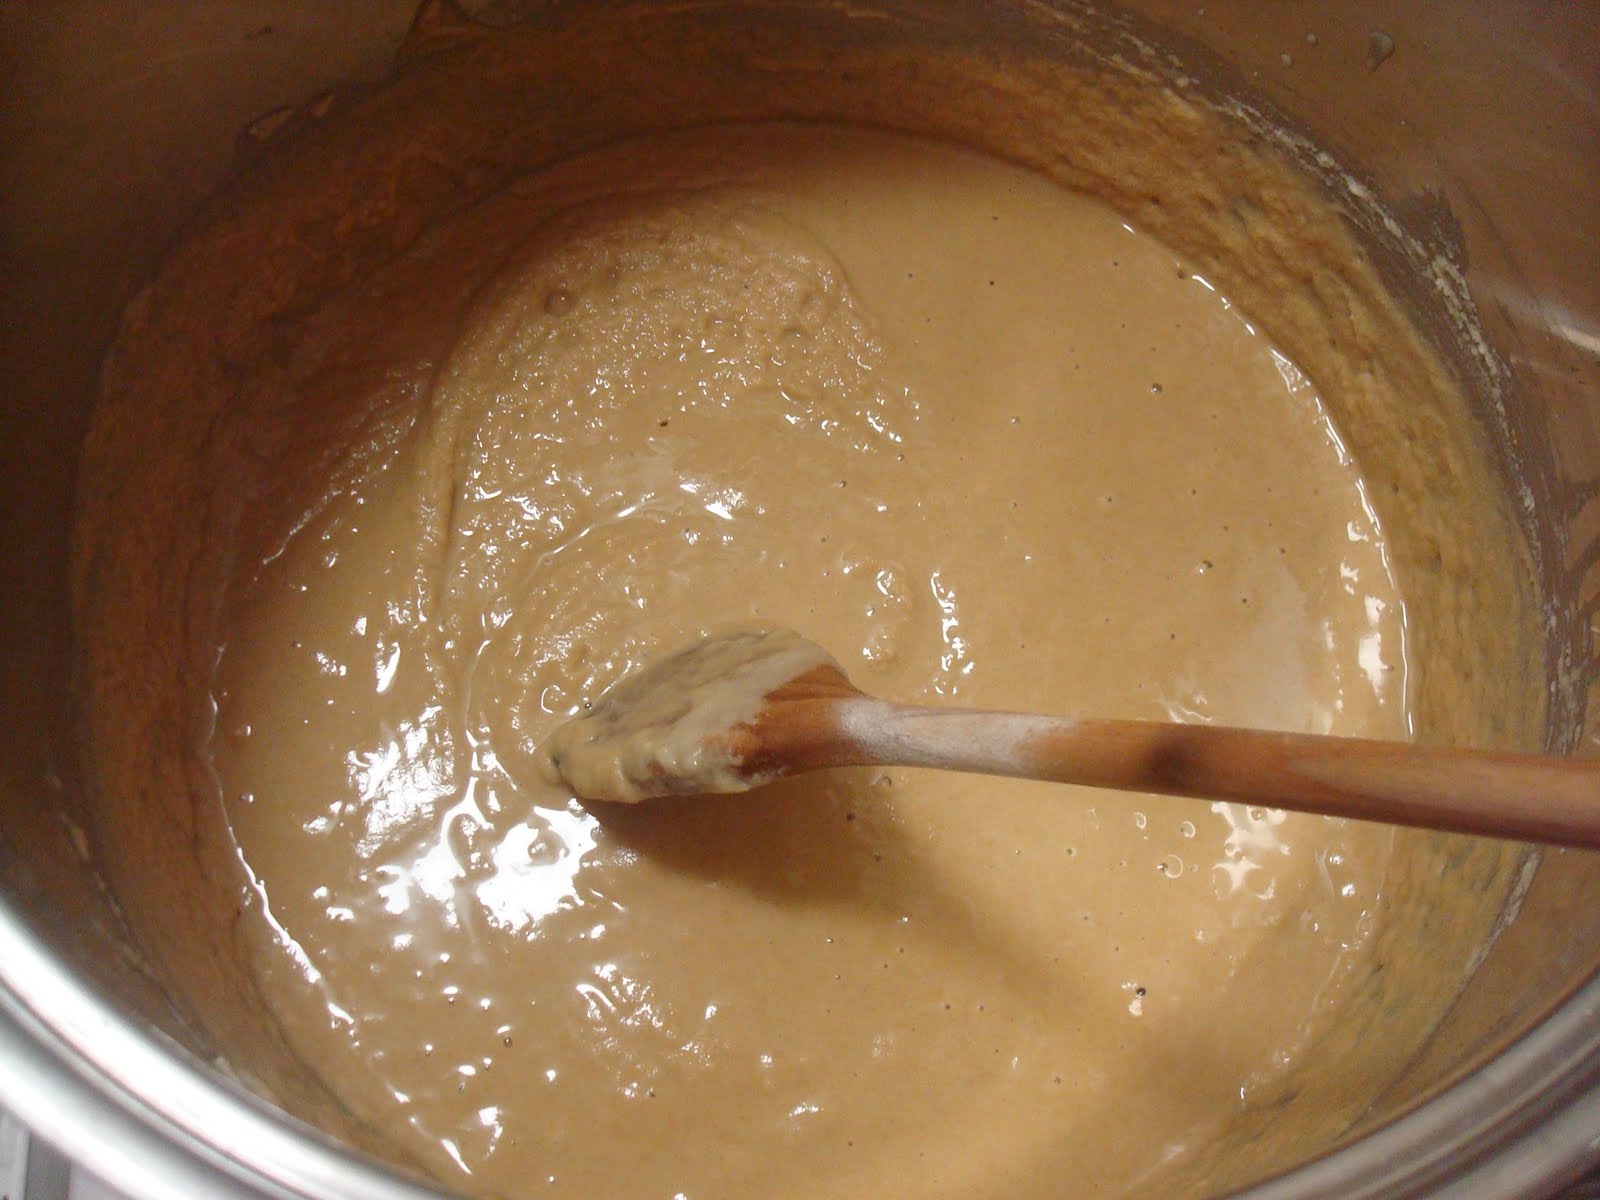
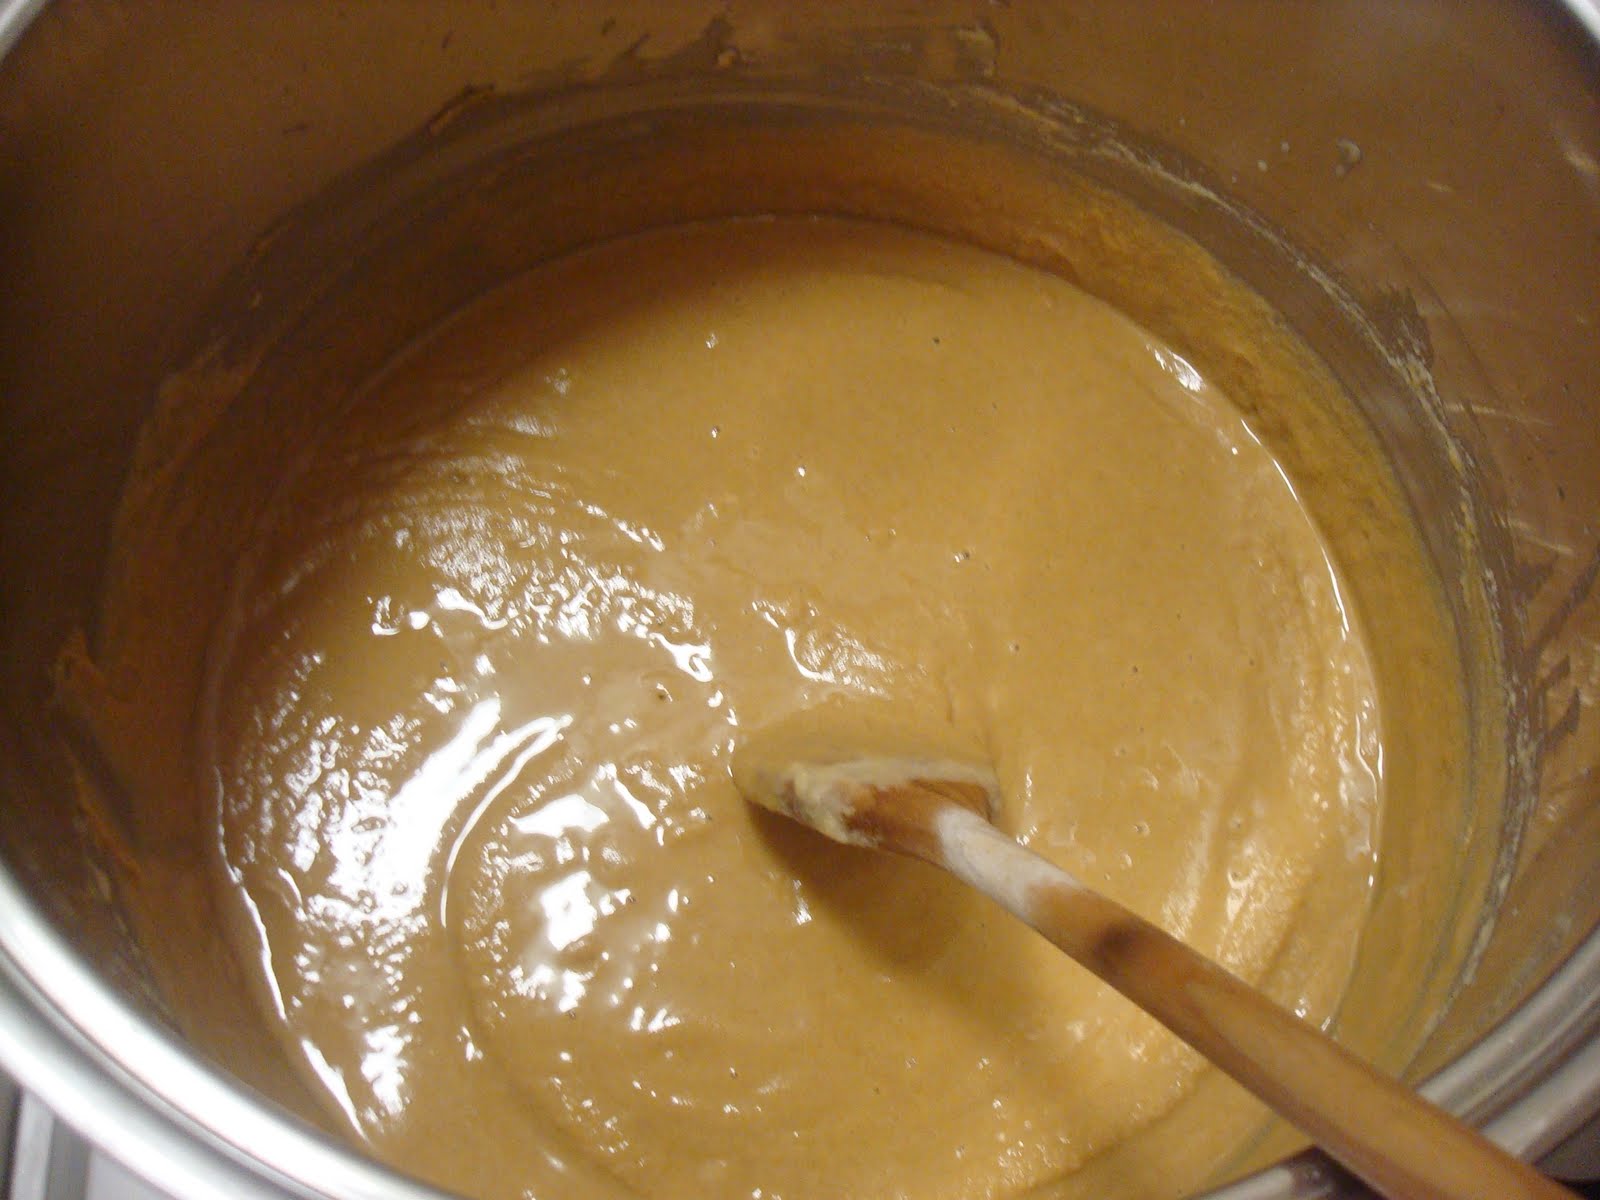
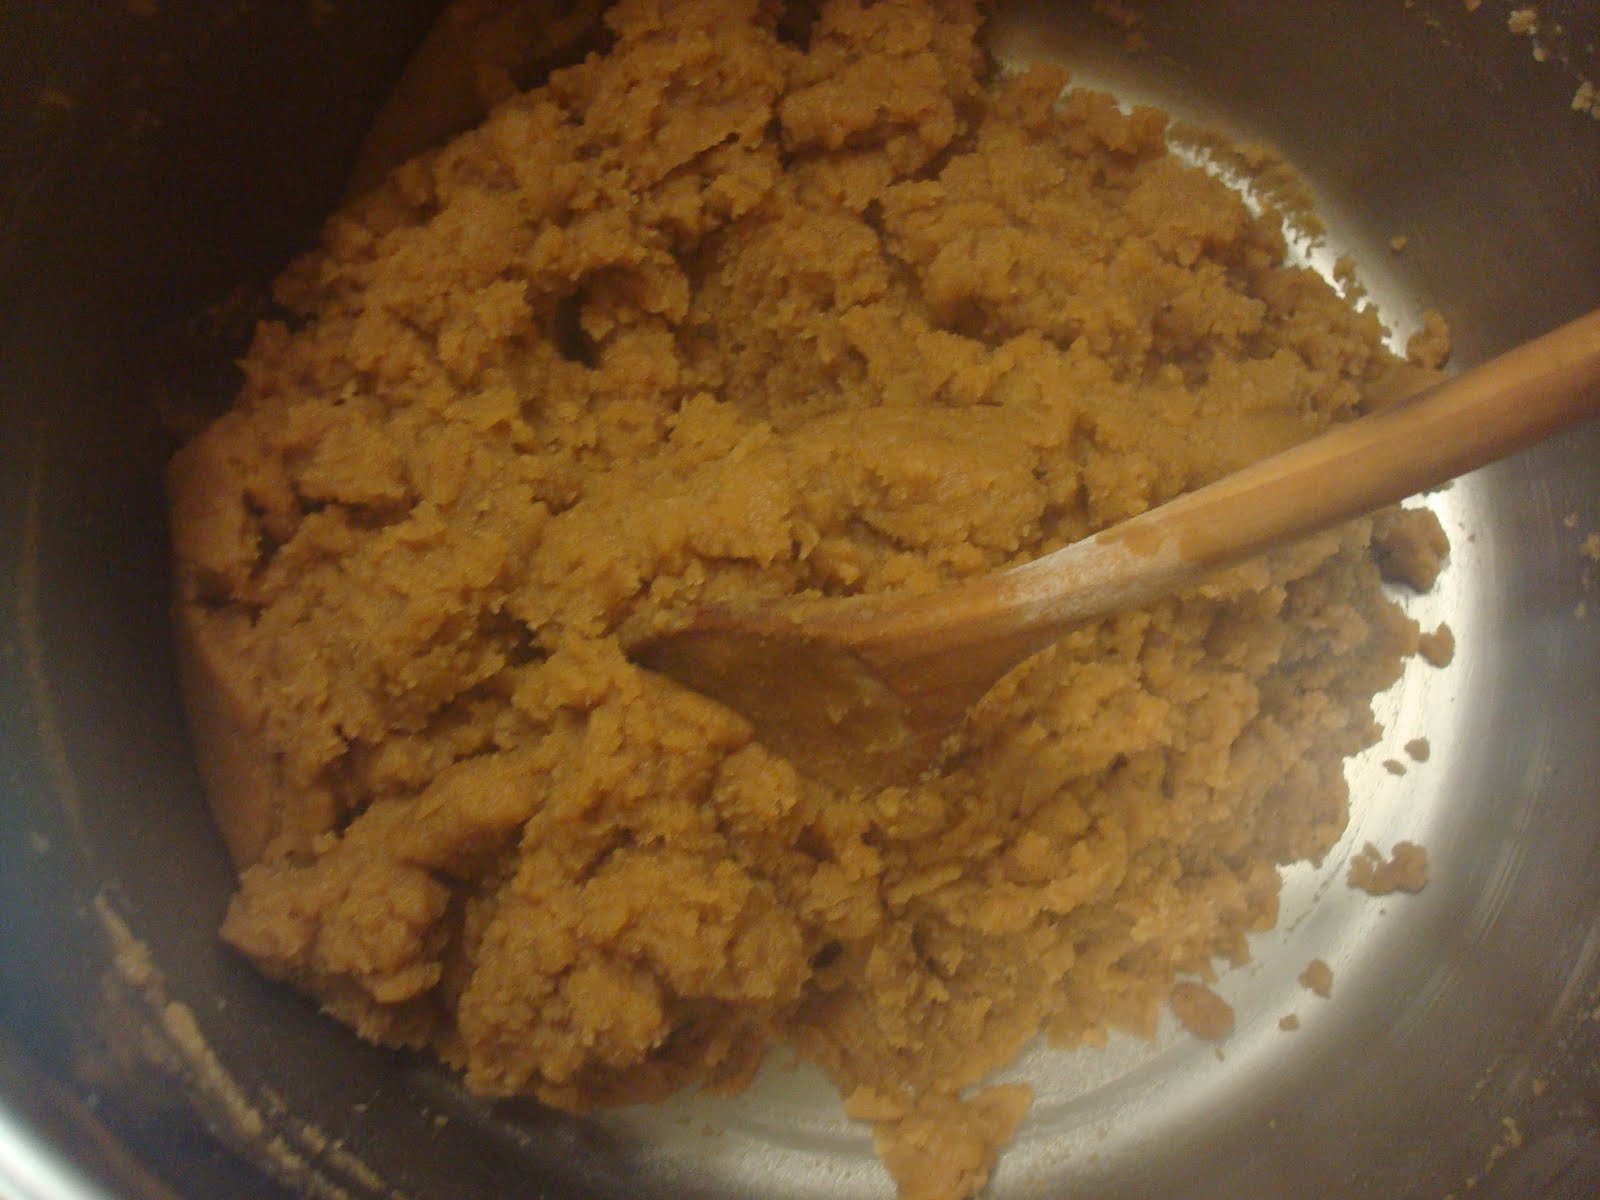
I am including quite a few rubbish pictures to help guide you through the process. First, heat up the oil in a big pot. Add the flour slowly and mix until smooth and creamy. It will look a bit like this:

Now you need to keep stirring over a medium heat to make sure you cook the flour without burning it. It might take a bit. Don’t get impatient, this is very important. In the meantime, pop the sugar and water in a pot and let it boil for 5-10 mins until it becomes a bit syrupy.
 
Your mixture is starting to look darker. First a bit like chestnut paste, and then it should take a brown-ish colour.
 
This is where I stopped. I think it needed a bit longer. If you keep stirring it won’t stick to the bottom, so you can wait until it gets a bit darker.
Now, add the syrup in batches. You should probably take the big pot off the heat. The first batch of syrup you add is going to make the mixture go mental. You’ve been warned hence you’re already more well prepared to do this than I was. This is how it looks after you start adding syrup. I think there is a drastic change because the hot syrup cooks the flour really quickly. It is very important that you keep stirring so it is all smooth, although this step won’t take more than 5 minutes.
 
You can now add a bit of cinnamon to the dough. Take a baking tray, sprinkle a few sesame seeds on the bottom and spoon in the dough. 
 
It looks all messy on the top so you need to take some baking paper, pop it on the top and then press down on the dough with your hands so it all becomes smooth and flat, like this:
 
Then, you sprinkle cinnamon, sesame seeds and a bit of sugar (preferably granulated) and, using a knife, cut it in diamond-shaped pieces, all the way to the bottom. This is very important as it will be quite hard to cut it in pretty pieces after it’s cooked.
 
Pop it in the preheated (200 degrees) oven for about an hour. You can check with a knife if it is cooked in the middle. It should be looking golden brown on the top.

You can enjoy it as an afternoon snack with a cup of coffee, especially if dinner is still a long time away and you’re feeling a bit hungry. It’s quite filling! It should be crumbly on the inside without being dry. It keeps for at least a couple of weeks out of the fridge. Just cover it with some cling film so it doesn’t dry out.

I think overall mine was a good effort! It wasn’t as hard to cook as I thought it would be, it was just a bit intense for a few minutes when I added the syrup. Certainly not time consuming! It was of course no match for the original version and I probably wouldn’t dare serve it to my granny, but I think I could convince my parents to have a taste without feeling embarrassed. 
If you decide to give it a go –  and you should! –  I’d love to hear how it went.

Previously on Round the World in 100 Recipes:
Spetsofai
Stuffed Onions
Lihnarakia
Beef with Aubergines

Next time on Round the World in 100 Recipes: Cheeeeeesy!

Lihnarakia (Greek #3)

I kept my word this time and made those Cretan treats I promised! They are called Lihnarakia and they basically consist of a sweet pastry enclosing a lemony, sweet, cheesy filling. And of course, with a good sprinkle of cinnamon on top. It was a bit of an adventure: Not only I’m not experienced with pastry, but I had never tasted one of these before today. Or seen one actually. But the idea sounded pretty good.

The cheese that is traditionally used is sweet mizithra. I couldn’t find it in England so I decided to ricotta as a substitute. I don’t know how traditional it is, since I’ve never actually tasted mizithra (shameful for a Greek, I know!). It tasted good though and that’s what matters! Having said that, it’d be great if someone who knows better can suggested a closer alternative or tell us how the two actually compare.

Anyway, on to the recipe, which I got again from Elias Mamalakis’ website. Unfortunately, I have been lazy and not changed the measurements from the confusing cups system to metric. I do think though that both the pastry and especially the filling are not too sensitive to changes of the ratios.

Lihnarakia (makes about 25- I halved it)

For the pastry:

1 sachet dry yeast
4 cups flour
1/2 cup olive oil
2/3 cup sugar
2 eggs whipped with a pinch of salt
3 tbsp greek yogurt

Whisk the olive oil with the sugar until smooth and creamy. Add the whisked eggs, the sugar and the yeast mixed with a teaspoon of the flour. Mix until smooth and then slowly add the rest of the flour until it reaches a workable consistency. Transfer onto a floured surface and knead for a few minutes. Place it back into the bowl and cover with a towel. Let it rest while you’re preparing the filling.

For the filling:

4 cups ricotta
2 egg yolks
1 tsp vanilla extract
2 tbsp honey
2 tbsp lemon zest
1/2 tbsp cinnamon
2 tbsp unsalted butter, softened
6 tbsp sugar

This is pretty straightforward as you can probably guess. Whisk everything together. Don’t worry if it’s not very smooth, as long as the bits are bits of cheese rather than bits of butter.

To assemble them, roll out the pastry into a thick sheet. I did this with my joke rolling pin so it must be quite easy with a proper one. Using a glass, cut circles of dough and then roll them out a bit more to make sure they’re not too thick. Put a spoon of filling in the middle.

I found the shaping a little bit tricky: the instructions tell you to lift the ends of the pastry and seal it at the top making 8 tips. I’m not sure if they are supposed to be completely sealed, mine opened up a little, either after shaping or during cooking. I don’t think it really matters.

For the top:

1 egg yolk whisked with a bit of water
1/2 tbsp cinnamon

Place them in a buttered tray and brush the tops with a little egg. Sprinkle with cinnamon and bake in a preheated oven (180 degrees Celsius) for 20-30 mins or until golden at the top.

They might sound a bit labour-intensive but the dough is really quite easy to handle and, after getting over the fact that you can’t seal them properly, the shaping is okay too. In any case, the flavour will compensate you for your effort! The pastry is crumbly and light while the filling is creamy and tastes fruity and sweet. Definitely worth giving them a go, and I’d love to hear about the results!

Previously on Round the World in 100 Recipes:
Spetsofai
Stuffed Onions

Next time on Round the World in 100 Recipes: I think I might be overdosing on aubergines.

James Martin I love you

When the dilemma between working in the evening or cooking for friends arises, unfortunately (for my PhD) there is only one choice.

I picked one of my favourite dishes ever for the main, the one with the catchy little title Chicken in Tomato and Red Wine sauce with Cinnamon and Nutmeg. I could omit the cinnamon and nutmeg bit I suppose, and even the red wine but, trust me, it’s so important it has to be in the name. It is what makes the kitchen smell heavenly and suddenly the time you spent skinning 10 chicken thighs makes sense. Hoping that I have demonstrated my love for this dish enough, I feel that it requires its own special post so I’ll leave it for another time (yes, I got greedy again and forgot to take a picture of the finished product).

For pudding, I thought I’d make something new. I had just bought James Martin’s Desserts book and so many things looked so exciting. I wonder now what made me choose Sticky Toffee Pudding with Toffee Sauce, since I’ve only eaten it once or twice and it certainly never made much of an impression. It must be the winter.

The recipe isn’t too difficult, but you need both a food processor and a blender. You will be rewarded though when the kitchen starts smelling like sweet treacle and golden syrup.

Sticky Toffee Pudding (from James Martin’s Desserts, or here)

Ingredients (serves 6-8)

75g soft butter
175g dark brown demerara sugar
200g self-raising flour, plus extra for dusting
1 tbsp golden syrup
2 tbsp black treacle
2 eggs
1 tsp vanilla extract
200g pitted dried dates
300ml water
1 tsp bicarbonate of soda

First thing I want to say is, make this even if you don’t like dried dates. Now we’re over that, grease a 23cm tin with the 25g of butter (I made it in a orthogonal one, whatever suits you best around that size) and dust the inside with flour. Preheat your oven to 200 degrees Celsius (180 if fan assisted).

Put the butter and the sugar in the food processor/mixer and blend them. Slowly add the golden syrup, treacle, eggs and vanilla extract and continue mixing. Then, add the flour, but turn down the mixer to a slower setting if you don’t want to kill all the raising agent (you don’t).
Now, the dates. Boil them in the 300ml water and then use a blender to puree them. Add the bicarb of soda and watch it come alive! While it’s still hot, add this to the egg mix and combine. Pour into the tin and bake in the preheated oven for 40-45 mins.

Toffee Sauce

This has been such a success that I was instructed to make it last night to go with the Guinness Chocolate Cake instead of the chocolate ganache I was planning to make. We call it JJ, but it is just inappropriate for me to tell you what it stands for. It is the easiest thing ever.

Ingredients

100g dark soft sugar
100g butter
200ml double cream

Not the healthiest thing ever, but do it anyway. Melt the sugar with the butter and then add the double cream. Bring to boil and simmer it until it’s thick enough.

Vanilla ice cream will go really well with this but we didn’t have any. It was still heavenly. You can reheat both the sauce (just bring to boil again) and the sponge. I just put it in the microwave for 10-15 secs but James says you could also use the oven for 5 mins. You can also freeze the sponge apparently, although I can’t see how it’s possible to make it and not eat it all in the next few hours.

Hazelnut and Nutella Cupcakes

You know you’ve had enough of working when you find yourself day-dreaming about food. It happens to me way too often, which makes me wonder whether I’m rubbish at what I do or just love food a bit too much. Probably a bit of both. Anyway, today I got thinking about baking and chocolate and since my favourite chocolate (by far!) is praline, the Hazelnut and Nutella cupcake was born!

These are the most amazingly nutty cupcakes I’ve ever eaten. And they’re gluten-free. And like all cupcakes, really really easy to make. The recipe I was aiming for was the simple cupcake recipe with half the amount of flour substituted with ground hazelnuts. Maths got a bit complicated when I realised that the gluten-free cake flour I was using contained sugar.

Hazelnut and Nutella Cupcakes

Ingredients (for approximately 16 cupcakes)

3 large eggs
6oz butter
6oz sugar
3oz flour (if your flour mix contains sugar like my gluten-free one, reduce the amount of extra sugar appropriately- I only added 3oz of sugar rather than 6)
3oz ground hazelnuts
1/2 teaspoon baking powder
1 teaspoon vanilla essence
nutella for filling

I like doing my cakes without using a food processor or a hand mixer since I find they become fluffy enough if you just hand-whisk them. And there is less to wash up. So, I softened my butter, added the sugar and mixed it into a uniform paste with a wooden spoon. Next, I added basically all the remaining ingredients (dry ones first, although it probably made no difference) and whisked until smooth.

The idea with the Nutella was to have a little drop of it sitting in the middle of the cupcake, so I put half of the mix for each cupcake in the cases, topped it with a little spoonful of Nutella and then added some more cake mix on top of it. It didn’t work as well as I would have wanted, so maybe I needed to dilute the Nutella with something (milk? cream?) to make it less dense and force it to stay liquid even after baking. Any ideas welcome! Having said that, the flavour was amazing and I really had to stop myself from eating them all before managing to get a photo!

I’m sure you can do similar things using different types of nuts, but I like the matching hazelnut-nutella combo and I find that, although almond is nice, it is not strong enough. Here, the hazelnut taste was coming clearly from the whole cupcake, rather than just the nutella centre (ok, bottom).

I couldn’t find any ground hazelnut so I got some whole roasted ones and put them through the food processor. Apparently, if you do that with a bit of sugar it stops them from getting too greasy and forming lumps. I only found out about that when it was too late. It was still fine and I think it turned out nuttier that it would have done if I had used ready-ground ones, because of all the juices they released.

I’m definitely becoming more of a baking fan, and I’d like to think that I am getting better at it too. I try and bake gluten-free whenever I can, because of my friend Aimee, and in most cases you honestly can’t tell the difference. I “cheat” by using a flour mix, which includes all the essentials for gluten-free baking, like xanthan gum and I also find that using a bit of ground nuts helps with texture.

I also had my first successful loaf of bread baked today and I might post a few pictures if I can get over the fact that the lighting is horrible. That’s what happens when your kitchen is a basement and you mostly cook in the evenings! I’m not a very patient person either, which means I will not spend ages trying to get the perfect picture, especially when the food smells so good! And I clearly lack the equipment which means I have to deal with a lot of rejection from sites like Tastespotting or Foodgawker (but not Tastestopping)! Wait, what do you mean they don’t reject anyone?

Almond Macaroons

These are my dad’s favourite biscuits and I’ve loved them since I was little as they were a bit of a treat in our house. I think this is where my love for everything almond-flavoured comes from, especially Amaretto. Is it wrong to blame my drinking habits on my father? Well, I suppose so, but then again, he doesn’t read my blog.

My auntie, though, has to take the blame for completely putting me off making my own macaroons. Being quite a good cook herself, with a particular skill at puddings and cakes, I always considered her failure to produce edible macaroons as proof that they are impossible to make.

We made a key lime pie the other day and, having several egg whites left over I thought I’d use them in some macaroons. They were going to waste anyway, so I didn’t really mind if they didn’t turn out amazing. I didn’t trust any recipes that I found online thinking that my mix will be too dry but it is amazing how much almond powder you can incorporate in a single egg white. So, I spent most of my time trying to add more things to the mix to make it into some kind of consistency that I could shape into balls.

They were pretty good but didn’t last for long so the next day I tried to reproduce the recipe. Given how sketchy the first one was, I am surprised they turned out so similar! Well, this is Take 2:

Almond and Coconut Macaroons
makes about 20

3 egg whites
200 gr ground almond
(up to) 100 gr coconut
200 gr sugar
3 tbsp cornflour
1 tsp almond extract

Whisk the egg whites slightly and then add everything else together, leaving the coconut last to control how wet your mix will be. You basically want it to still be moist but to be able to shape it into balls. Place them on some baking paper on a tray and then press each one down with the back side of a wet spoon.

Bake for approximately 15 mins or until golden. Let them cool down for a little bit before you eat them – if you can resist! And please, don’t try and balance one on your forehead, it will burn you. It has happened before.

Somada or The Drink that Makes Me Homesick

Somada (or Soumada, as it is called in other areas of Greece) is a non-alcoholic drink made with almonds and sugar.

The real version is made with some bitter almonds mixed in too, and I really think this is what makes the difference. I’ve had Somada from the Mastiha Shop before, and it really didn’t taste right at all. Bitter almonds contain hydrogen cyanide which is lethal if consumed in large enough quantities, which really is true about everything in this world. Unfortunately, in the case of bitter almonds, a couple of dozens are enough.

You don’t need that many to make Somada. I also think that heat removes it, but don’t take my word for it. If you make this at home, the easiest thing to do is use bitter almond extract, as it will be quite tricky to find bitter almonds.

The general idea is to grind the almonds into a paste, place them in muslin and soak them in water, so that the water gets all the flavour and juices. Then, you add the sugar – a silly amount of sugar, but it needs it- and boil it so it reduces down to a thick liquid.

Somada is served in a short glass mixed with cold water. You can drink it just like that, but the best bit is dipping paximadia in it:

I feel like I should have more memories of this one: It’s one of the most traditional drinks back home, but all I remember is talking about it rather than drinking it. I tried it a couple of times as a teenager and didn’t really like it, but grew to love it later on. If you get the chance to try authentic somada, give it a go, it’s brilliant. Even better if you have it in a traditional cafe.

It’s all about rhubarb…

If you follow food blogs like I do you will have noticed the recent rhubarb craze. Everybody is making cakes, crumbles (or crisps as they like to call them on the other side of the ocean), muffins, ice-creams, tarts with rhubarb. I understand that in America there is quite a short rhubarb season, from April to September, which would justify why everyone goes absolutely mental about it, since it is so amazing! But here, thankfully, we have rhubarb almost all year round, and I am prepared to trust Gregg Wallace when he claims that rhubarb is in season all year apart from Autumn.
My rhubarb obsession has resulted in an almost endless supply of rhubarb crumble all winter. Now that the spring/summer is here, I thought I might spice things up with a little strawberry.

Rhubarb and Strawberry Crumble

To prepare the filling, I chop up the rhubarb and boil it with some red wine until it becomes very soft and jam-like. Some people prefer it with some bite to it- I don’t. Rhubarb is very sour and usually takes a fair amount of sugar to make it edible. I don’t really follow a recipe and I like to add the sugar to the rhubarb at the end and taste it to see if it’s sweet enough. Brown sugar is definitely the way forward here. The strawberries are added after the rhubarb is cooked, and left it the pot to cook for as long as you want them- depending on whether you actually want whole fruit in your crumble or not. At that point the kitchen smells amazing and I would happily eat the whole thing without the topping. Actually, it goes great with just a bit of yogurt.
But back to our target, time to make the crumble topping. I use a simple recipe that involves just 3 ingredients:

175g/6oz plain flour
50g/2oz brown sugar
100g/3½ oz butter

You can add some chopped out ground nuts like almonds for some more texture/taste.
The amount of topping is usually enough for 4-5 stalks of rhubarb, depending on their size.
Bake for as much as you can really, before it burns, because the topping will just get nicer with time. Half an hour is a minimum I usually find, if you want to avoid a floury crumble.
You can serve it with either cream or custard, and I even like it with some greek yogurt, especially if the filling is a bit on the sweet side.
I’m not looking forward to September…

Happy Hour


Being a hard-working (!) PhD student, you have to look forward to the social event of the week, happy hour. I know it sounds bad: lots of mathmos drinking beer in the maths department. But, it’s actually surprisingly social. And the drinks are cheap. And nice, since I choose them.

Now, I love beer and I’m not a cider fan. I’m not a cider-drinker fan either. So, when people requested some cider on the happy hour menu, I got a bit annoyed. Anyway, I know I said I don’t like people that choose cider over beer, but sometimes you have to accept your friends with their flaws, and that’s what I’ve done with my French friend who has been introduced to the concept of pubs but still can’t get her head round beer. Weird.

Her favourite is Henney’s Frome Valley cider. Since it has been available at happy hour, it’s one of the most popular drinks. It comes from Frome in Herefordshire. You can get sweet, medium or dry. I’ve only tried the dry one, and it’s awesome. At first it tastes like apple juice, fruity and sweet, but the aftertaste is crisp and dry. In Paul’s words (see picture): It’s GOOD. And he isn’t a cider drinker either.